How to Enable or Disable Maintenance Mode in Magento 2
- May 22, 2023
- Categories: Magento, Magento 2

In our blog post titled “Shutting Down a Magento Store for Maintenance,” we provided instructions on how to temporarily close a store for maintenance, along with the limitations of maintenance mode in Magento 1. However, with the passage of time, things have evolved. The Magento platform has undergone significant changes, becoming more adaptable to the evolving needs of businesses.
Today, we have Magento 2, and it’s important to explore the maintenance mode features offered by both Magento Open Source and Adobe Commerce. In this article, we will delve into the advantages and disadvantages of each solution, as well as discuss relevant use cases for website owners or merchants. So, let’s begin our exploration.
What does “maintenance mode” mean in Magento?
To put it simply, maintenance mode in Magento refers to a specific state of the application where it is temporarily taken offline for maintenance purposes. This mode serves as a way to notify customers and search engines that the website is undergoing updates and will be back online soon. It is commonly used in e-commerce platforms to inform users about the temporary unavailability of the website while improvements or fixes are being implemented.
How does maintenance mode in Magento function?
- In Magento, enabling maintenance mode has the following effects:
- It prevents visitors from accessing the storefront. Instead, they see a single page displaying a “Service Unavailable” message and cannot navigate through the website’s pages.
- It halts the execution of system processes that Magento runs through the CRON scheduler.
- It triggers a 503 server error response code, indicating that the website is currently offline. Search engines interpret this response as a signal of temporary downtime and do not modify the existing SEO status of the website.
If you find this information intriguing, let’s proceed further.
4 Methods to Enable Maintenance Mode in Magento 2
1. Enabling Maintenance Mode in Magento 2: Utilizing the Built-in Tool
The most widely used approach to activate maintenance mode in Magento requires the following prerequisites:
Having the Magento 2 e-commerce platform installed
Running Magento 2 in “production” mode
- Allow Website Access to Specific IP Addresses
bin/magento maintenance:allow-ips <ip address> .. <ip address> [--none]- Enable a maintenance mode
bin/magento maintenance:enable- Disabling Magento Crons: Modifying app/etc/env.php and Adding the Following Lines
'cron' => array (
'enabled' => 0
),- Clearing Configuration Cache: Executing the Following Command
bin/magento cache:clean config- Terminating and Disabling Existing Cron Tasks (Adobe Commerce Only): Utilizing the Following Commands
php vendor/bin/ece-tools cron:killphp vendor/bin/ece-tools cron:unlock- Disable a maintenance mode
Enabling Magento CRONs: Adjusting app/etc/env.php for Activation
'cron' => array (
'enabled' => 1
,- Flush configuration cache
bin/magento cache:clean config- Disable a maintenance mode
bin/magento maintenance:disableBenefits of Utilizing Maintenance Mode in Magento 2:
- Installation of Magento 2 e-commerce platform is a prerequisite.
- Running Magento 2 in “production” mode is necessary.
- The whitelist of IP addresses, specified in <Magento_root_folder>/var/.maintenance.ip, allows access during maintenance mode.
- The presence of <Magento_root_folder>/var/.maintenance.flag signifies that Magento is in maintenance mode.
- Enabling maintenance mode with the bin/magento maintenance:enable CLI command does not affect Magento CRON jobs, which should be separately stopped.
- In a multi-store Magento 2 setup, different skins can be used for individual websites/stores.
2. Enabling Maintenance Mode via Content Delivery Network (CDN)
Most widely used CDNs offer an access restriction feature that allows blocking access to a website or multiple websites (in the case of a multi-store setup). However, it’s important to note that this method does not switch the software into maintenance mode using the bin/magento maintenance:enable CLI command.
CDN blocking is particularly useful when there is a need to test specific website functionalities without granting access to all potential visitors.
- To access the Magento admin panel, navigate to the following path: STORES > Settings > Configuration > ADVANCED > System > Full Page Cache > Fastly Configuration.
- Specify the IP addresses of individuals permitted to access the website.


If you possess the file <Magento_root_folder>/var/.maintenance.ip, you can expedite the process by utilizing the provided command to include all IP addresses in Fastly.
bin/magento fastly:maintenance -u- Enable maintenance mode
- use the next CLI command:
bin/magento fastly:maintenance -eTo deactivate the maintenance mode in Fastly, you have two options: either click on the “Enable/Disable” button in the Magento admin panel, or execute the subsequent CLI command:
bin/magento fastly:maintenance -dEnabling maintenance mode through the CDN has a drawback in that it doesn’t allow for different content (skin) on the “503 Service Unavailable” page. This limitation arises because the CDN only permits specifying a single page content for all websites, which can be problematic in multi-store setups.
The advantages of utilizing maintenance mode through the CDN are as follows:
- Fastly responds with a 503 header code.
- Magento itself remains operational and is not put into maintenance mode.
- Merchants cannot establish or utilize a distinct maintenance page or message for a specific website, especially in the case of a multi-store setup.
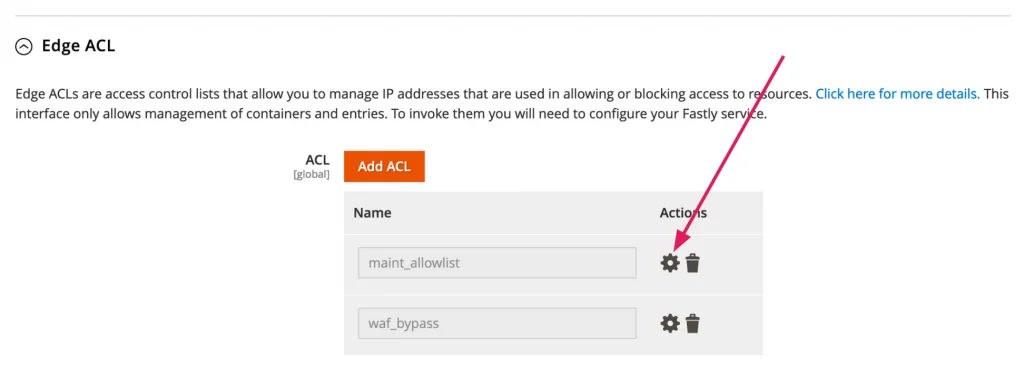
- The file var/.maintenance.ip can be utilized to populate the Fastly “maint_allowlist” feature.
- The file var/.maintenance.flag is not generated, indicating that technically Magento is not in maintenance mode.
3. Through the web server
This method bears a strong resemblance to CDN access restrictions and is suitable for situations where the Magento application is not installed or when there is a need to limit access to specific websites. The main advantage of this approach is that merchants can restrict access to a particular website, especially when Magento is configured as a multi-store. Please refer to the diagram below for further clarification.
In terms of the diagram, merchants have the option to block access to “Website 1,” while “Website 2” and “Website N” remain accessible to all users.
Furthermore, Adobe recommends this approach for implementing Magento application upgrades.
However, a drawback of this solution is that merchants are required to engage hosting providers to configure the web server correctly.
Advantages of utilizing maintenance mode through the web server include:
- The Adobe documentation advises enabling maintenance mode through the web server during a Magento upgrade.
- Maintenance mode can be activated for all websites or selectively for specific ones.
- Magento itself can be toggled into maintenance mode or kept operational.
- A separate maintenance page can be configured for a specific website, especially in the case of a multi-store setup.
- The web server configuration allows for the specification of allowed IP addresses and a flag to indicate maintenance mode.
4. Using Website Restriction in Magento 2
As previously stated, the “Private sales and events” feature is only available in Adobe Commerce.
This method is applicable when merchants wish to make updates to a specific website and temporarily restrict access for visitors. For instance, if a catalog includes a large number of products and merchants need to promptly update product prices while preventing customers from purchasing products with outdated prices.
To activate maintenance mode using the “Private sales and events” feature, follow these steps:
- Log in to the Magento admin panel and navigate to STORES > Settings > Configuration > GENERAL > General > Website Restrictions.
- Enable the “Access Restriction” by setting it to “Yes.”
- Choose “Website Closed” as the “Restriction Mode” option.
- Select the appropriate CMS page from the “Landing Page” dropdown, which should contain the content for the “Service Unavailable” page.
- Set the “HTTP Response” option to “503 Service Unavailable.”

The benefits of using the “Website Restrictions” feature for maintenance mode are:
- The Magento application can be installed and used without being in maintenance mode.
- The CMS page can be easily set as a maintenance page for a specific website, especially in the case of multiple stores.
- Merchants do not need to have technical skills to enable and utilize this feature.
Conclusion
enabling or disabling maintenance mode in Magento 2 is a straightforward process that can be easily managed. Evrig Solutions offers top-notch Magento 2 maintenance services, ensuring seamless operations for your e-commerce website. With their expertise and experience, they can efficiently handle maintenance mode configurations and provide comprehensive support for your Magento 2 platform. Trust Evrig Solutions for all your Magento 2 maintenance needs, and experience uninterrupted performance and reliable service for your online business.
